Cairn Items & Gear Guide: What to Carry Up Mount Kami
Cairn's gear system is deliberately small and physical: four quick-item slots on the D-pad, six pitons on the harness, and a backpack limited by space rather than weight. There is no equipment spreadsheet to min-max. Instead, every item you carry has a clear job, and the skill is knowing which jobs the next wall demands. This guide covers what each piece of kit actually does, the real carry limits and craft costs, and which exploration upgrades are worth the detour. All mechanics are verified against the release version (January 29, 2026) via the official controls reference and community guides; where the game keeps a system qualitative, we describe it without inventing numbers.
Last updated: September 8, 2026
The Four Quick-Item Slots
On the wall, your entire toolkit is the D-pad. The full backpack stays closed unless you are at a bivouac or hanging off belay on a piton, which is why quick-item discipline matters more than inventory size.
Slot
Items
When You Use It
D-pad Down (key 1)
Backpack / quick rest
Quick breather on the move; full pack only opens at bivouacs or off belay
D-pad Left (key 2)
Bottle / barometer
Hydration plus weather forecasting; check before every long push
D-pad Up (key 3)
Piton / flashlight
Protection placement and hold visibility in the dark
D-pad Right (key 4)
Chalk / finger-tape state
Grip boost (next 12 handholds) and hand-condition checks
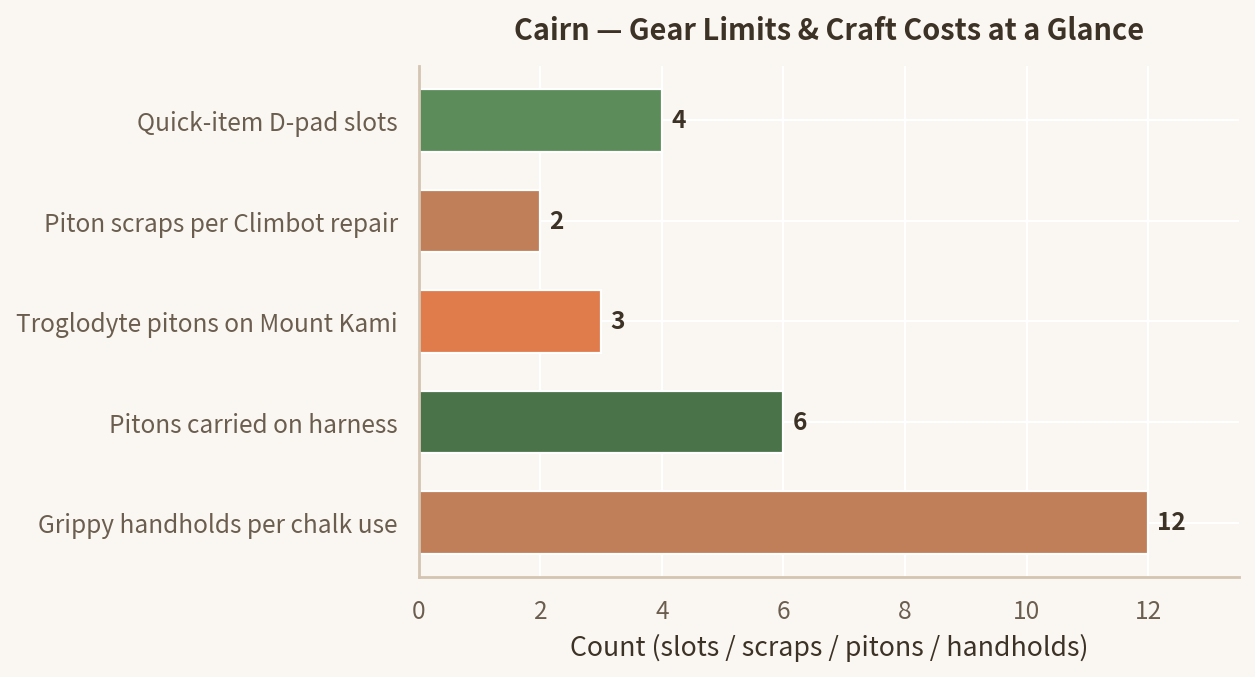
Cairn's whole loadout: four D-pad quick items for on-wall actions, six pitons on the harness, and a backpack that limits you by physical space rather than weight. The full item list, including everything craftable, lives on the items & crafting page.
Carry Limits & Craft Costs: The Real Numbers
Cairn tells you very few numbers directly, but these five govern every loadout decision you make.
Item
Value
Notes
Quick-item D-pad slots
4
Down / Left / Up / Right: your whole on-wall toolkit
Pitons carried on harness
6
Spares can ride in the backpack; Troglodyte pitons count toward the same limit
Troglodyte pitons on Mount Kami
3
Indestructible; hidden in guardian statues
Piton scraps per Climbot repair
2
Scraps come from failed placements and loot
Grippy handholds per chalk application
12
Reapplied with D-pad Right
The five counts behind every loadout decision, from the table above.
Every Piece of Kit, and Where It Comes From
Cairn items fall into a few clear groups, and each one has a specific job on the wall. The table below covers every piece of kit you carry, what it does, and where it comes from, from the six harness pitons to the survival blanket.
Gear
Role
Source
Notes
Pitons
Checkpoints, fall protection, rest stations
Loot + Climbot crafting (2 scraps each)
Place at regular intervals; 6 on the harness
Troglodyte pitons (x3)
Indestructible anchors that bite any rock
Guardian statues: The Vault, The Ancient (below the Palace of Wind bridge), The Secret
Save for no-fall and brown-rock sections
Chalk
Extra grip on the next 12 handholds
Climbot: composted trash
Use before cruxes and small-hold sections
Finger tape
Protects torn fingers, preserves grip endurance
Loot + supplies
Apply at bivouacs before long pushes
Canteen + bottle
Hydration; cookable drinks restore energy too
Refill at streams and water sources
Recipes turn water into dual-stat drinks
Barometer
Reads incoming weather
Standard kit (D-pad Left)
Rain wrecks grip; cold complicates pitons, so plan around it
Flashlight
Reveals holds in darkness and shadowed rock
Quick items (D-pad Up / L2)
Mandatory at night and in caves
Glowing gloves
Visibility upgrade for dark and bad-weather climbing
Troglodyte structures
Pairs with flashlight for night pushes
Bivouac kit (tent)
Warm up, cook, tape fingers, sleep, save
Carried from the start
Bivouac sites are finite; never skip one
Loadout Archetypes: Light, Balanced, Storm
There is no universal best kit in Cairn. A light pack feels excellent until weather or retreat quality turns against you, while a storm kit feels safe until the extra weight taxes every move. The useful comparison is not raw power but what kind of mistake each kit can survive.
Loadout
Best For
Main Weakness
Light Kit
Known routes, good weather, fast summit timings
Little margin for cold or complex retreat
Balanced Kit
Most normal attempts and first clears of moderate lines
Not outstanding in either speed or storm protection
Storm Kit
Uncertain forecasts, high exposure, awkward descents
Higher stamina tax from the first section onward
New players should default to balanced: it exposes the tradeoffs clearly without making every mistake fatal. Switch to light only when you already know the route and its descent rhythm; switch to storm only when the environment itself, rather than the wall, is the real enemy. If you are unsure, keep the tools that improve retreat quality. They rescue more attempts than pure speed items ever will.
Pack Against a Concrete Problem
Every strong loadout solves one clear problem: friction, cold, exposure, or recovery. The mistake is trying to solve all four equally on one climb. Decide what the route demands most, then build the lightest pack that still protects your worst-case descent.
Route Problem
What Carries It
Main Tradeoff
Short technical sections and clean weather pushes
Minimal pack
Weak if you must improvise a long retreat
Long traverses where the descent is worse than the ascent
Extra pitons + scrap reserve
Every spare anchor spends backpack space you cannot get back
Early starts, shaded walls, and summit wind exposure
Warm layers + hot drinks
Overpacking warmth can crowd out recovery food
Late descents and forced bivouacs
Emergency food + medicine
Usually cut too early by players chasing lighter packs
Three rules hold up on every route. Lock your retreat plan before trimming weight. Let the barometer decide clothing, rather than ego. Cold damage and visibility problems end more runs than raw movement difficulty. And treat emergency food as time insurance: it buys the freedom to wait out a bad section instead of forcing a desperate push. Think of each pack as a risk budget: light kits spend it on speed, storm kits spend it on survival, balanced kits buy flexibility.
Cut First, Keep Longer
Cut First
Redundant tools that only matter on one rare section.
Excess food when the route has reliable camp timing.
Comfort items that do not improve survival or retreat quality.
Duplicated niche consumables you can craft or forage again later.
Keep Longer
Warmth layers when wind or rain can appear mid-descent.
Piton capacity on any line with complex reversal.
Emergency recovery if the route lacks frequent safe rest points.
One medicine reserve for the descent, in addition to the summit push.
Common Overpacking Mistakes
Bringing full storm protection on a route with frequent camps and safe bailout points.
Doubling up on utility tools while forgetting fast recovery items.
Keeping luxury items that do nothing once the route turns technical.
Cutting warmth first instead of cutting redundant hardware or niche consumables.
Most failed pack edits remove the exact tool that would have made a retreat calm instead of chaotic. If a route scares you more on the way down than on the way up, your gear plan should respect the descent first. The best packs feel a little conservative on paper and surprisingly efficient on the mountain.
Packing Rules for the Long Ascent
PITONS FIRST
Pitons are checkpoints, rest stations, and fall protection in one item. Never leave a bivouac without a full harness; Climbot turns two scrap sets into one piton, so repairs are cheap.
CONSUMABLE DISCIPLINE
Chalk and tape are renewable; pack space is not. Carry enough for the next two or three walls rather than the whole mountain; you will forage, loot, and craft along the way.
FOOD & WATER
Fill the canteen at every stream. Learned recipes turn plain water and foraged plants into drinks that restore energy and hydration together, better value per slot than raw snacks.
EXPLORE FOR UPGRADES
Troglodyte pitons, glowing gloves, chalk-bag upgrades, and recipes all come from caves and ruins off the main line. A short detour early pays for itself on every wall afterward. See the three Troglodyte piton locations.
FAQ
What are the four quick-item slots in Cairn?
The D-pad holds four context pairs: Down is your backpack / quick rest, Left is your bottle and the barometer, Up is pitons and the flashlight, and Right is chalk and finger-tape status. PC defaults are the number keys 1-4. Alternate quick actions are toggled with L2 (LT on Xbox, X on PC). These four slots are your entire mid-climb toolkit: the full backpack only opens at a bivouac or while off belay on a piton.
How do I get more chalk and pitons?
Climbot crafts both. One piton costs two sets of piton scraps, which drop from failed placements, loot containers, and environmental pickups. Chalk is produced whenever you compost trash with Climbot. Both are meant to be used liberally. The crafting loop exists so you never hoard.
Which gear upgrades should I prioritize?
The three Troglodyte pitons first: they are indestructible and bite into any rock type, including the dense brown rock normal pitons cannot penetrate. After that, the glowing gloves (visibility in darkness and bad weather), chalk-bag upgrades, and new food recipes, all found by exploring troglodyte caves, temples, and villages off the main line.
How does backpack space work in Cairn?
The backpack is limited by physical space rather than weight; every item occupies real room in the bag, so packing is a layout puzzle. Because space is tight, decide before each push: pitons and chalk for the wall, food and water for the day, tape for your fingers, and leave behind whatever only helps in perfect conditions.
Do I need the flashlight and barometer?
Yes, and both are free to carry. The flashlight lives in the D-pad Up / L2 quick items and reveals holds in darkness, shadowed corners, and storms. The barometer (D-pad Left) reads coming weather so you can decide whether to climb or wait at a bivouac; that matters because rain seriously degrades grip and cold makes piton placement harder.
What items are in Cairn?
The Cairn items you carry are a small, fixed set, and the table above lists each one with its job. On the wall you use pitons, chalk and finger tape for the rock, the canteen and bottles for water, the barometer for weather, and the flashlight for dark holds; the bivouac kit stays with the tent. Food, drinks and medicine are consumables that cook into stronger versions with timed buffs. Materials are piton scraps, compostable trash and foraged plants. Permanent upgrades add the three indestructible Troglodyte pitons, glowing gloves, chalk-bag upgrades and the survival blanket. The crafting page indexes the full set of Cairn items by category.
How many items can you carry at once in Cairn?
Four quick-item slots on the D-pad are live on the wall, and six pitons ride on the harness. Spares and everything else are limited by backpack space rather than weight, so packing is a layout problem. The full backpack only opens at a bivouac or while off belay on a piton, which is why quick-item discipline matters more than inventory size.
Last updated: September 8, 2026. Gear mechanics verified against the release version of Cairn (PC/PS5, January 29, 2026). Fan guide, not affiliated with The Game Bakers.